In this tutorial, we will learn to interface MPU9250 & MPU9265 9-DOF Gyro Accelerator Magnetometer Module with Arduino on unity3d.
we will see an example to measure 3-axis values of Gyro, Accelerator Magnetometer Arduino ide and unity3d
samples the gyros, accelerometers, and magnetometers
calibrate an MPU9250 DMP (accelerometer and gyroscope and magnetometers )
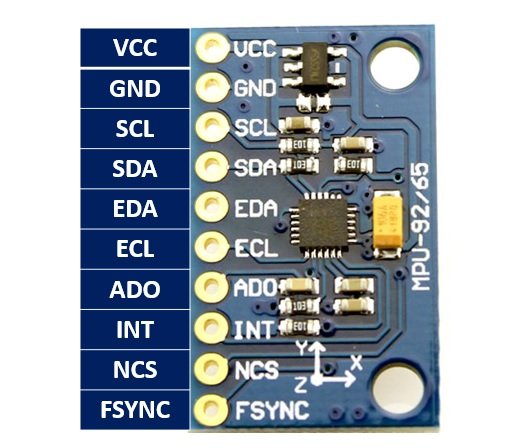
The MPU-9250 is a 9-axis motion tracking device that combines a 3-axis gyroscope, 3-axis accelerometer, 3-axis magnetometer, and a Digital Motion Processor
.jpg)
#include "MPU9250.h"
// an MPU9250 object with the MPU-9250 sensor on I2C bus 0 with address 0x68
MPU9250 IMU(Wire,0x68);
int status; void setup()
{
// serial to display data
Serial.begin(115200);
while(!Serial) {} // start communication with IMU
status = IMU.begin();
if (status < 0) {
Serial.println("IMU initialization unsuccessful");
Serial.println("Check IMU wiring or try cycling power");
Serial.print("Status: ");
Serial.println(status);
while(1) {}
}
}
void loop()
{
// read the sensor
IMU.readSensor();
// display the data
Serial.print(IMU.getAccelX_mss(),0);
Serial.print("|");
Serial.print(IMU.getAccelY_mss(),0);
Serial.print("|");
Serial.print(IMU.getAccelZ_mss(),0);
Serial.print("|");
Serial.print(IMU.getGyroX_rads(),1);
Serial.print("|");
Serial.print(IMU.getGyroY_rads(),1);
Serial.print("|");
Serial.print(IMU.getGyroZ_rads(),1);
Serial.print("|");
Serial.print(IMU.getMagX_uT(),0);
Serial.print("|");
Serial.print(IMU.getMagY_uT(),0);
Serial.print("|");
Serial.print(IMU.getMagZ_uT(),0);
Serial.print("|");
Serial.println(IMU.getTemperature_C(),2);
delay(100);
}
Download unitypackage
https://shorturl.edafait.com/?mpu9250_9265_earth.unitypackage